

How to Make a Cinemagraph: Tutorial
This is a tutorial on how to make a cinemagraph. I've been intrigued by the growing popularity of these cinematic photographs and I spent some time making a few myself and documenting my approach. Let's start from the beginning, shall we?
What is a cinemagraph?
In layman's terms, a "cinemagraph" is a moving picture, an otherwise still photograph that has a touch of movement. If you're familiar with the Harry Potter movies, you can think of the walls of Hogwarts as covered with cinemagraphs.
Technically speaking, a cinemagraph is a glorified animated GIF, a file type that by all accounts, has gone the way of the Dodo bird. With the rise of Flash, online video, and CSS, animated GIFs are a thing of the past — or at least were a thing of the past.
Although this technique has likely been around for a while, it exploded on the web scene in 2011 thanks to Jamie Beck and Kevin Burg, a couple of creatives with a cinematic eye for photography. Their cinemagraphs were all over the Internet, and had a lot of people (including myself) asking,"How did they do that?"
With some research and a few hours of trial and error, I made a few cinemagraphs of my own. Although these aren't the best you'll see, try to follow along with my approach and apply the steps to making one of your own.
Start with a video
One of the first and most interesting things I learned about the cinemagraph technique is that they're actually made from video. Originally, I thought these were still images, painstakingly stitched together with Photoshop, but thankfully an HD video camera did most of the work for me.
For my first attempt, I used my Nikon D7000 to shoot some HD video. Details:
- 50mm Nikkor Lens
- 1920 x 1080 — 24 fps — high quality
- f/8 — 1:16 video clip — no sound
- camera mounted on a tripod, very important
Import video frames as Photoshop layers
I imported the video into iPhoto as a .MOV file. Next, I opened Photoshop CS3 and imported "Video Frames to Layers…"
Note: I tried importing the video frames into CS5, but apparently I need the 32-bit version of the program to do so. Instead of reloading the program, I decided to revert to CS3 instead.


Photoshop imported 300 frames to individual layers.
Next, I opened the Animation window, which is where you'll choose the frames you want to use, clip the rest, and adjust the animation settings. Your animation window will look something like this:
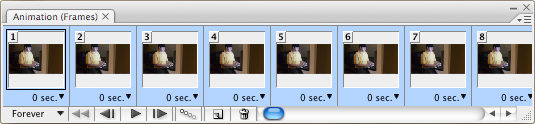
Choose the frames you want to animate
Choosing the frames to animate is important. When selecting the frames, I focused only on the part of the image I wanted to animate, in this case, my hands. I kept these things in mind:
- With animated GIFs, file sizes tend to get out of control in a hurry, so I chose to select just 50 frames, or as close to that number as I could get.
- I searched frame by frame to find two instances where my hands were in the very same position, or again, as close as I could get. In this case, frame one and frame 55 were a match.
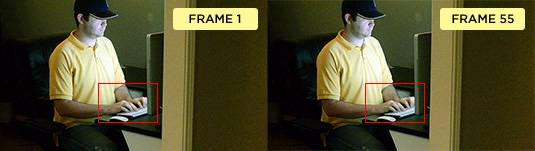
Once I had chosen these 55 frames, I deleted the remaining 245 frames and their corresponding layers.
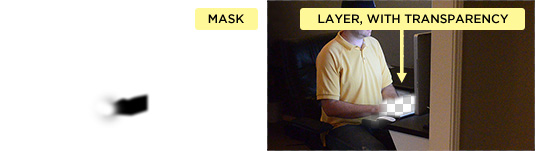
Create a static top layer and apply a layer mask
Next I turned my attention to the non-moving part of the cinemagraph. I chose layer 45 to represent the static part of the image, those pixels that will not move or change — in this case, everything but my hands.
I duplicated this layer and put it at the top of all the other layers in my layers palette. I named the layers Static.
I added a layer mask to the Static layer and began to paint away the part of the image that want to move, in this case, my hands. Here's what the mask looks like and how it effects the layer.
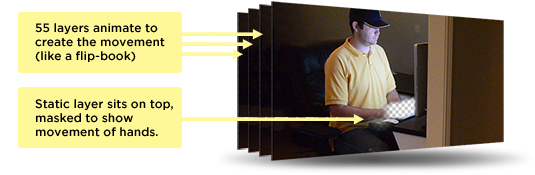
In a nutshell, Photoshop created 55 layers that animate like a flip book to create the movement. Then, I added one more static layer on top and cut a hole in it so the movement shows through.
Apply the desired animation settings
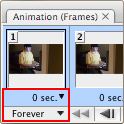 I had the layers in place and it was time to set them in motion. In the bottom-left corner of the animation window I chose loop "forever" from the drop-down menu. Then, so the movie would play at a believable speed, I selected all the frames and chose "no delay" from the the drop-down menu under the first frame.
I played the movie a couple of times to see how it turned out. I was pleased with the loop. Because I had been so careful to choose two frames that were close to identical, I had barely a hiccup where the last frame met the first frame. I was lucky in that way. If there hadn't been such a seamless loop, I would have had to spend time tween-ing frames, or running a few duplicate frames in reverse to smooth out the transition.
Resize the image and save as GIF
I mentioned earlier that file sizes were important. A GIF is played like a movie in a browser and if the movie is too long or too big, it will run really slowly and look pretty bad.
Two elements that contribute to file size are number of frames/layers and pixel dimensions of the actual image. In this case, I had 55 frames and reduced the size of the image to 600 x 338. The saved GIF came out to 1.7MB, which is fairly large but manageable, in my opinion.
I first saved the image as a Photoshop file, so that I could easily go in and edit it in the future. Then I saved it for the web as a GIF, making sure that the animation looping option was set to "forever." Save.
Things I can improve on
Like I said, I know my cinemagraphs aren't the best, but I'm proud to call them my first attempt. I know for sure I'll only get better from here. I've already got a list of things to improve on.
Better video
A higher quality video would help tremendously. Better lighting and more appropriate camera settings would result in a less noisy final image.
Also, I believe I would trade the higher resolution video (1920 x 1080) at 24 fps, for the lower resolution (1280 x 720) at 30 fps, because I think more frames would equal smoother movements.
In addition, why shoot at such a high resolution if I have to reduce the size of the image anyway, to account for file size?
Better looping
The more complicated the movement, the harder it will likely be to loop the image. I anticipate ironing out the hiccups to be one of the more tedious tasks to creating these images going forward.
Better photography
In the end, what makes a good cinemagraph is the same as what makes a good photograph: composition and lighting. If you don't start with the goods, the finished product can't be great. These will only be as creative as I am.
Going forward
Add a comment to my post if you've got any tips or hints for how to make a cinemagraph. Or share a link to a cinemagraph you've made by following this tutorial or any other.
MONTHLY MARKETING INSIGHTS.
Get thought-provoking and actionable insights to improve how your firm makes a connection with your customers.

LEAVE A COMMENT
[...] How to Make a Cinemagraph: Tutorial | Digett __________________ 604Foodtography Facebook Twitter Tumblr Flickr [...]
[...] your sequence to find the perfect loop for export. 3. Cinemagraph Tutorial for Photoshop CS54. How to Make a Cinemagraph: Tutorial5. How to Make Cinemagraphs — Still Photos that Move Like Movies!6. How To Make Your Own [...]
[...] How to Make a Cinemagraph: Tutorial [...]
[...] How to Make a Cinemagraph [...]
[...] How to make cinemagraphs – Tutorial [...]
[...] How to make cinemagraphs – Tutorial [...]
[...] think again, it’s more than that. You can learn how to make one via this tutorial – How to make cinemagraph tutorial.Go to Source Author:Related content: Logo Design Work In Process Showcase Brilliant Digital Art by [...]
what video file type can i use in photoshop?
Good question, Stan.
You can only use video if you're using Photoshop CS5 Extended. Check out the link below to learn more (including what video file types are compatible):
http://answers.oreilly.com/topic/1721-working-with-video-in-photoshop-c…
[...] สามารถศึกษาได้จาก Tutorial อันนี้ครับ @ How to make cinemagraph tutorial … ถ้าลองทำดูแล้ว [...]
[...] How to Make a Cinemagraph: Tutorial [...]